

 Roeshel over at the DIY Showoff Blog is having another one of her Surprise Parties! Head on over to see some great before and after furniture makeovers. I submitted an earlier post showcasing our DIY mirrored nightstand.
Before:
After:


Roeshel over at the DIY Showoff Blog is having another one of her Surprise Parties! Head on over to see some great before and after furniture makeovers. I submitted an earlier post showcasing our DIY mirrored nightstand.
Before:
After:
I’m re-publishing parts of an old post from May to join up with the Multiples Party over at Vintage Junky. I apologize in advance for the poor photo quality, I took them when I was relatively new to blogging and hadn’t “perfected” my photography skills, and I’m too lazy to re-take them all!
 I realized while hanging my newest piece of fleur de lis artwork that I really and truly am addicted to all things fleur de lis. While I know it may seem cliche to some, I have a connection to fleur de lis given that I am born and bred in Louisiana. It is such a unique symbol not only for our state, but for the city of New Orleans, where I lived for several years (and still miss). I guess my addiction really began during my days as a merchandise buyer for a tourist/gift shop in NOLA. Having access to tons of fleur de lis merchandise at wholesale prices only fueled the fire! Now I know this all may seem like overkill, but I've tried to keep it subtle and spread throughout the house so you don't walk in and become overwhelmed with fleur de lis. And while I have many pieces of fleur de lis artwork and decor items, each piece is meaningful and unique. I thought I would share a few of my favorites today.


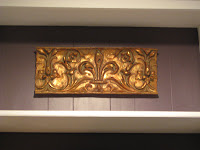


Although it can be fun to decorate in multiples, I try not to let it completely take over the house. Hopefully they are all spread out enough that my house doesn’t look like a fleur de lis showroom! But just when I think I’ll never buy another fleur de lis again, I’ll find one that I simply cannot live without!
Be sure to head on over to Vintage Junky to see what else is multiplying!! Don’t forget to enter the great giveaway while you’re there.
***********************
Please take a moment to check out my earlier post and give me your feedback on my “Blast From the Past” Decorating Party, I would appreciate it!
***********************
If you have time today, head on over to the Kattilac Shack and visit some of the participants in the Pet Parade. Just leave a comment and you’ll be entered to win a $100 gift certificate to Hobby Lobby! Here’s a couple posts I did a while back of my pug, Gidget:
Recently, my best friend and I got together to transform these flea market 8x10 frames ($4 each) into some cute artwork for her little girls’ bathroom:
Our first step was to purchase a pile of cute coordinating scrapbook paper at the craft store:

After deciding on a theme, we drew the shapes on the backside of the paper and cut them out:

We used glue dots to adhere the shapes to the paper and used a sharpie and stick-on crystals to embellish them further. Here’s a close-up of the butterfly:

And all three together: In the newly spray painted frames:


 We did this project for around $20 for all three. I’ve seen similar ones for sale online for $30 or more each, so that’s quite a savings if you can do it yourself! This project probably took us a couple hours while gossiping and chatting.
This artwork was the perfect finishing touch for just about the cutest little girls’ bathroom you have ever seen!! I can’t wait to show more in a future post, you are going to love it, I promise!
I’ll be linking up to these parties today, hop on over to see more great projects:


***********************
Please take a moment to check out my earlier post and give me your feedback on my “Blast From the Past” Decorating Party, I would appreciate it!
 The first is a fall door arrangement put together by my best friend, hanging on her front door.


 My mom was inspired by the huge Homecoming corsages that can be seen around this time of year at the local high schools. I’m not sure if it’s more of a tradition in the south or what, but around here the corsages can get pretty large, adorned with silk mums, long ribbons, and various trinkets, and can often cost $100 or more if you buy them pre-made. They usually end up looking something like this:
 And a close-up of the center:
 Geaux Tigers, perfect! If you’re a football fan, this type of wreath is a great way to incorporate your team spirit into your fall decor. Again, just be creative and mix and match elements in your favorite team’s colors.


 If we like it, we’ll continue on with the rest of the kitchen after tearing out the existing backsplash in the next couple of weeks. Here’s a look at a quick before and after since I applied the first coat this morning:
 So far, so good! I’m liking the black and I’m sure it will look even better once the two top coats are on. Be sure and follow me on Twitter, I’ll be posting updated photos there!


