Be sure and check out the SUPER SALE going on now on my Facebook Page! Fabulous deals on out of season merchandise! Click HERE to check it out!

Sunday, May 30, 2010

Best DIY Project of May

It’s party time over at Beneath My Heart again, time to show off our favorite DIY project of May.  After featuring all of my friend’s projects this month, I had a lot to choose from!  It was so hard to pick a favorite, but I decided on the tin light fixture(?) turned cloche base that my friend transformed.  It’s almost hard to believe that this:
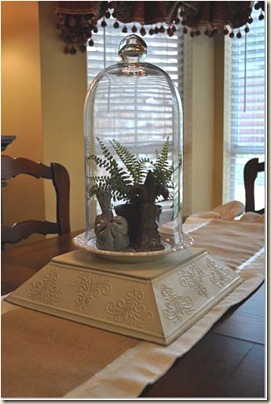
was once this:

For more details on the transformation, CLICK HERE.  Also be sure and check out all my friend’s projects if you get a chance:

Pottery Barn Inspired French Lampshade

Burlap Table Runner

Salvaged Shutter Turned Wall Art

and don’t forget to visit the rest of the party participants over at Beneath My Heart!

Thursday, May 27, 2010

Lucky Me

I’ve been a lucky girl lately! I have won several blog giveaways and been bestowed with a couple blog awards as well.  It’s about time I officially thanked everyone for their generosity!

Janimal from Delilah’s Momma recently honored me with the Beautiful Blogger Award.

Delilah’s Momma has some great tutorials for crafts done on the cheap, check her out when you get a chance.

Heidi at The Craft Monkey passed on the Trendy Blog Award.

Heidi is a fellow Louisiana crafty lady, so be sure and check out her cute blog, too.

Instead of passing on these awards, I’ll just point you to my long list of blog favorites over there on the left.  It’s impossible to pick favorites!

Now onto my loot…..

I won some fabulous jewelry from Lil’ Miss Momma! I got to pick three pieces from this collection:

Ashley at Lil’ Miss Momma has probably the cutest little boy I’ve ever seen, and she makes some really awesome crafts in her spare time. Plus, she has THREE more fabulous giveaways going on right now!

Of course you remember the table runner my friend made with the fabric I won from Project Pretty.  And I won a gorgeous frame as well.


Courtney from Project Pretty has an impeccable sense of style, which is coming in handy since she and her husband are busy designing a new home. Check out her blog to follow their progress!

I also recently won a cute set of jewelry from Jo at That’s My Story.  Can you believe these are paperclips?  You can see more of her designs here.

Jo just celebrated her one year anniversary and reached 100 followers at the same time!  Her blog is full of wonderful treasures like recipes, crafts, and thrifty finds.

Last but not least, my Ribbon Dance Wands and Bracelets were featured on One Pretty Thing Daily DIY yesterday.  I love One Pretty Thing because she re-caps all the great DIY projects all in one spot every day!

Well, with all this luck coming my way, it seems I may just have to pass some of it along soon…..hmmm….maybe there will be a summer giveaway in the near future?! Stay tuned, and have a great holiday weekend!

Tuesday, May 25, 2010

Guest Post on Deep South Magazine

I’m so excited to have a guest post up on Deep South Magazine today!

Deep South is a magazine with a regional focus on capturing life, Southern style. From the faces, places and food to the art and music of the region, Deep South aims to bring readers stories that portray life in the South as it exists today, while also harking back to the history and traditions of an area known for its culture, color and style.

Erin contacted me after she read about my trip to Canton Trade Days and asked if I would share a little about our trip.  Head on over to read the re-cap!

deep south 

Monday, May 24, 2010

DIY Ribbon Wands, Bracelets, and Hairbands

ribbon projects My niece turned six last week, and I had some ideas rolling around in my head for her gifts that I wanted to make.  She loves to dance and twirl, so when I saw these ribbon bracelets on ZuZu Girl Handmade, I was inspired!

So here’s a little tutorial on how I made some pretty dance accessories for my niece!

For the wands, you will need:

~Dowel rods

~Screw eyes

~Keychain rings

~Assorted ribbon

~Spray paint (if desired)

IMG_0997

IMG_1009Check the dollar store, Target Dollar Spot, and the sale bin at your local craft store for inexpensive ribbon. I bought a six pack of dowels that were already cut to the perfect length, used a coupon for the pack of keychain rings, and got the screw eyes at Wal-Mart.  Depending on the type and amount of ribbon you use, this can be a fairly inexpensive project since it makes multiple wands/bracelets. 

Insert a screw eye into one end of the dowel rods.  You may have to drill a small starter hole, or borrow your husband’s muscles!

IMG_1001IMG_1002If you want to spray paint your wands, cut some slits in a cardboard box to hold them up, or you could stick them in floral foam.  IMG_1003

Spray paint your desired color.  Of course I went with pink.  Attach a keychain ring to the screw eye:

IMG_1004

You can either tie on your ribbon using knots, or loop it through, keeping it all one length or varying the lengths, whatever you prefer!

IMG_1007IMG_1008

And that’s it, you’re done!  Watch your favorite princes dance and twirl with the ribbons trailing behind her!

IMG_1014

For the ribbon bracelets, you will need:

~Ribbon

~Bracelets

Duh!

I found this cute pack of plastic heart shaped bracelets in the dollar section at Michael’s.

IMG_1010

For the bracelets, I found it easiest to glue all your ribbon together at one end.

IMG_1011

Then loop it on your bracelet.

IMG_1012IMG_1018

And you’re done!

IMG_1015

This leaves your dancing queen’s hands free yet still gives the twirling ribbon effect!

IMG_1016

I used the same technique on a hair elastic, then glued a bow and rhinestone to the top of the ribbon.

IMG_1053IMG_1057IMG_1056Looks too cute with a “Just Dance” tank top I embroidered for her!                IMG_1049  

I’ll be sharing this quick and easy project with DIY Day (the last one, boo!), Get Your Craft On, Lucky Linky Tuesday, I Made It!, and other fun parties seen HERE

Sunday, May 23, 2010

Salvaged Shutter Turned Wall Art

Ok, I think this is the last treasure from our girls’ trip to Canton that I have to show y’all.  My friend was bound and determined to find an old shutter to hang over the bay window in her kitchen.  She found the perfect candidate for $10.00:

shutter

And here’s how it looks now, after she painted and distressed it:

shutterafter2She used several different techniques to achieve the worn and weathered look she was going for.  She first painted the shutter a solid green.  shutter2She then sanded in spots and colored the bare wood spots with a wood stain pen.  shutter3shutter4Then she just started playing with her two shades of green paint, adding darker green to some areas and going back on top of it with the lighter green paint again to create a natural worn look,  and finally dry brushed dark green all over to "age" it some.  This takes a lot of playing around.  She spent about two days just layering paint and sanding on spots to get the look she wanted.    shutter5  shutter7 shutterafter It’s so perfect in that spot!   

shutterafter3

I have to thank my bestie, Jessica, for letting me share all her wonderful crafts and transformations over the past couple weeks.  Y’all be sure to give her all the credit in the comments! If you missed any of her features, check out the following posts:

Pottery Barn Inspired French Lampshade

Flea Market Find Transformation (Terrarium Base)

Ruffled Burlap Table Runner

I swear, if she had her own blog, she’d be over here guest posting all the time!  I just may have one or two other projects of hers to share in the coming posts…..

I’ll be sharing today’s post with DIY Showoff, Metamorphosis Monday, Thrifty Treasures, Trash To Treasure, Power of Paint, and Transformation Thursday.

Thursday, May 20, 2010

Spring/Summer Beading Projects

I have been a little lax in my beading projects lately for the Artbeads Blogging for Beaders program, but I have finally come up with a few projects to share.

I really love my beaded plant hangers, and I wanted to create some more “jewelry” for my plants. I came up with an idea for a little jeweled stake when I had some extra supplies left over from a project I’ll show you next week.

IMG_1058

You’ll need a wooden dowel rod, a screw eye, a key chain ring, needle nose pliers and your chosen embellishments.  I used some beautiful glass beads and a sterling silver charm provided from Artbeads.com.  Some jump rings, and wire or chain are also needed.  Artbeads is a great source for all sorts of supplies like this, and they don’t necessarily have to be used for jewelry!

IMG_0997

Insert the screw eye into one end of the dowel rod.  You can then spray paint them your desired color if you wish.   IMG_1002

Attach the key chain ring to the screw eye. IMG_1004

Using the jump rings and chain, thread your beads and charms and add them to the key chain ring.

IMG_1065

Stick it in your favorite plant for instant bling!  IMG_1061IMG_1059IMG_1064

If you’re not a plant person, this same technique can be used to make something else fun, like a fancy bookmark.  Artbeads also has a great selection of bookmarks for beading and embellishing.

IMG_1066 IMG_1069 IMG_1070You can find other great ideas in the Artbeads Learning Center.  Sharing with:

catcraftFavorite Things Friday_25fffbigbutton2

<b>Join us every Friday...</b>

*Disclosure: The materials used in this project  were kindly provided free-of-charge by Artbeads.com, within the frames of Artbeads.com blogging program. I have not received any compensation from Artbeads.com. The post above represents my honest personal opinion.

Related Posts with Thumbnails