Be sure and check out the SUPER SALE going on now on my Facebook Page! Fabulous deals on out of season merchandise! Click HERE to check it out!
Showing posts with label office. Show all posts

Friday, June 18, 2010

Where I Create

I’m joining Karen at My Desert Cottage for her second annual “Where Bloggers Create” party this Saturday.

You can see my post from last year HERE (including a pic of the room mid-chaos).  Not much has changed, besides the awesome addition of my embroidery machine and a new TV.  Since I knew I would be having guests, I cleaned up a bit, and as you can see, there’s not much “creating” going on right now!
 
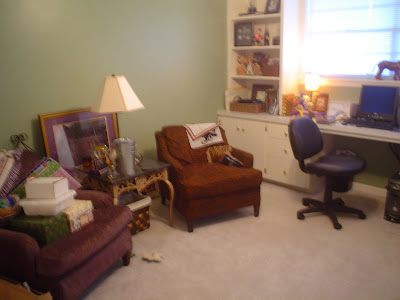
I’m lucky to have a dedicated office/craft room.  Here’s the view from the door as you walk in:
IMG_1213
I made the window topper from an old bedskirt, you can see more details HERE.
 
These built-ins are really nice.  Plenty of storage and space for decorative accessories as well.
IMG_1215
Here’s my sewing/crafting desk.  My mother-in-law helped me make the sewing machine quilt using this tutorial from Get Your Craft OnHere’s a tip…..the cheap vinyl placemats are great to protect your work surfaces.
IMG_1214Here is the sitting area of the room.  Those chairs are usually covered with whatever project I’m currently working on.IMG_1216
And my craft closet: IMG_1217
The right side stores supplies, finished projects, and projects in process. The left side stores paperwork, shipping supplies, and Etsy supplies. IMG_1218You can see some of my organizational tips and creations in these posts:
 
 
To see some of the projects I’ve worked on in this room, click on the “Sewing Projects” and “Craft Projects” links at the top of the page, or check out my Etsy store or Facebook page!  

Thanks for stopping by! I can’t wait to see others’ spaces.  Here are some other fun parties I’ll be linking up to:


 Favorite Things Friday_25fffbigbutton2<b>Join us every Friday...</b>


Friday, August 14, 2009

Hooked on Easy, Low-Cost Window Treatments

I’m joining Julia at Hooked on Houses again for Hooked on Fridays. We’ve lived in our current home for three and half years and just last week I finally got around to finding window treatments for the last two bare windows. This large window in the front of the house has nice wide blinds so my goal was for a more decorative treatment rather than one to provide privacy. Here’s what it looked like before:

IMG_1751

And now after:

IMG_2461

It’s amazing how something so simple can make the room more complete and cozy! I had actually tried to find fabric to make a valance last year but could never find anything just right. Then just recently it finally occurred to me that simple brown faux silk panels were the way to go. I was able to get these 96” panels at JCPenney for $60 for the pair. Instead of doing one long rod, I used the shortest rods I could find, one on each side of the window. I found the rods at Lowe’s for about $9 each. Hubby actually cut a few inches off of each one to make them even shorter.

IMG_2471

I left the length long and they’re pooling at the bottom, I’m still undecided on this:

IMG_2475 The next window I tackled was the one in our office/my craft room. Here’s what it looked like before:

Office after2We just recently got new vinyl windows in all our bedrooms, and I wanted to show them off, plus the mini blinds were really getting on my nerves. Since this window looks out into our backyard, I have no problem keeping it uncovered, so I decided a valance would be the best solution. I had an unused bed skirt made out of the same tiger fabric that the chairs are upholstered with, so I re-purposed it and made a valance. Of course I couldn’t find a black tension rod so I had to buy a white one and spray paint it black.

IMG_2465Now I have a beautiful unobstructed view into the backyard and lots of natural light for my crafting!

**********************************************************

My DIY Hotel Room Key Jewelry was featured on One Pretty Thing’s Daily DIY on Thursday! I love this website, so check it out when you get a chance!

oneprettything

Friday, July 24, 2009

Hooked on Crafting: Where I Create

I’m joining Karen at My Desert Cottage for her first ever blog party showing off everyone’s creative spaces.  I’ve gotten more and more hooked on crafting (especially making personalized frames and tins) over the last year, so it’s great that I have a dedicated space to use.  I do most of my crafting in our office.  So here are some photos of the room all nice and neat:

Office after2The desktop computer isn’t there anymore, so I have more desk space for my painting and crafting.  The large TV is also gone and now replaced with this desk:

IMG_2142 Now I have a great space for my sewing projects and I don’t have to mess up the dining room!  Okay, here’s what it normally looks like when I’m in the middle of a project (or two):

IMG_2239

IMG_2240

I use most of the space in the closet for my craft supply storage.

IMG_2279

Here’s a more detailed view.  Yes, I went slightly OCD with the arrows:

craftstorage

craftstorage2craftstorage3I also store some supplies (like glitter, glue, scissors, carbon paper & stamps)  in the desk drawers:

IMG_2284 Well, that’s it! I feel lucky that I can just make a mess in here and then just walk away from it or shut the door without the whole house looking messy.  I’ve got some great work surfaces, but I could always use more space! I can’t wait to see everyone else’s crafty spaces!

I’m also linking up with Hooked on Houses for Hooked on Friday!

P,S.  If you liked my craft paint organizer (in the closet), stay tuned for a chance to win one of your very own personalized just the way you want, I’ll be doing a giveaway soon!

Thursday, July 16, 2009

Transformation Thursday: Mirror to Memoboard

I’m joining Gina at The Shabby Chic Cottage for another edition of Transformation Thursday. You may remember this mirror I picked up at Good will a few weeks ago:

IMG_2073

IMG_2075I didn’t have a spot for another mirror, so I thought it would better serve me as a memo board. The first thing I did was to spray paint it my favorite color, purple. Then I used some scrap batting, tiger fabric and yellow ribbon to cover the cardboard backing and make a memo board.

IMG_2125

IMG_2134

Here it is hanging in my office:

IMG_2141

IMG_2142

Total cost: about $6.00 for the mirror and a can of spray paint (split with another transformation you’ll see later). Perfect! I ♥ it! You can see the other memo boards I’ve made here in my Etsy Shop.

Head on over to The Shabby Chic Cottage and check out all the other terrific transformations.

Also stop by Bloggeritaville for Thrifty Thursday and A Soft Place to Land for DIY day.

Edited on 8/2/09 to join Twice Remembered for Make it Monday.

Thursday, June 4, 2009

Show Us Where You Live Friday - Office Edition


You know what day it is!! It's time to join Kelly's Korner Blog for another edition of Show Us Where You Live Friday! This week's featured room is the office.

We are really lucky to have one room dedicated solely as our office. It's really becoming my craft room more and more since we have a laptop now, but we still use it when we need to print stuff or work at a desk.

This bedroom in our home has great built-in bookshelves and a desk along one wall, so I knew the first time we looked at the house that that room would become our office. Here's what it looked like when we moved in:

Ick! Green walls and grey carpet! I immediately painted the walls and we had enough hardwood floors from our living room left over to eventually use in this room too. Here's how it looks now:

The built-ins are not only great for storage, but for displaying all of my LSU collectibles (and a few of my hubby's NC State ones as well). Not that I have a huge collection of LSU stuff or anything. I mean, I just have a few sentimental pieces. Or ten. Or fifty.

One of the best parts is that I get a whole closet dedicated to craft and seasonal storage!

I wish I could set up my sewing maching in here, but there's just not enough room at the desk if I'm working on a big project. This room serves its purpose perfectly for now. Thanks for looking, I can't wait to see everyone else's room!

Related Posts with Thumbnails